Confirm Tolerances With Your Sheet Metal Fabricator
It's crucial to emphasize that the numerical values and guidelines outlined in this document are intended for general reference in the context of sheet metal design. They should not substitute for the specific, tailored tolerances provided by your custom fabricator. Variabilities in material type, equipment, tools, and other nuanced factors necessitate a customized approach to defining tolerances and clearances for each unique project.
Engaging in a collaborative dialogue with your fabricator is essential to align design aspirations with practical manufacturing capabilities and constraints. This alignment ensures that the established tolerances are not only theoretically sound but are also practically achievable, balancing precision, quality, and cost-effectiveness.
Every project presents a distinct set of requirements and challenges. Adapting tolerances and clearances to these unique parameters ensures that the final product aligns with the intended functional, structural, and aesthetic objectives while adhering to the highest standards of quality and efficiency.
Tolerances Guideline for Sheet Metal Fabrication
Specific tolerance guidelines integral to sheet metal fabrication are detailed in the table below. Each entry details the acceptable variance for various methods of fabrication and assembly. With values expressed in both millimeters and inches, the table serves as a reference, covering aspects from forming and bending to the relationships between holes, edges, and hardware.
Tolerance Guidelines* |
Forming or bending |
+/- 0.508 mm (0.020") |
Bend to hole or feature |
+/-0.254 mm (0.010") |
Diameters with inserts |
+/-0.0762 mm (0.003") |
Angularity |
+/- 1° |
Holes |
+/-0.127 mm (0.005") |
Edge to edge |
±0.127 mm (0.005") |
Edge to hole |
±0.127 mm (0.005") |
Hole to hole |
±0.127 mm (0.005") |
Hole to hardware |
±0.254 mm (0.010") |
Edge to hardware |
±0.254 mm (0.010") |
Hardware to hardware |
±0.381 mm (0.015") |
Bend to hole |
±0.381 mm (0.015") |
Bend to hardware |
±0.381 mm (0.015") |
Bend to edge |
±0.254 mm (0.010") |
Bend to bend |
±0.381 mm (0.015") |
These defined tolerances bridge the gap between theoretical design and practical manufacturing. They are instrumental in ensuring seamless alignment and assembly, enhancing the overall aesthetic and functional output. By adhering to these guidelines, professionals can navigate the complexities of material and process variances, ensuring each product exemplifies excellence in structural integrity and performance.
What Factors Impact Tolerance During Sheet Metal Fabrication?
Actual tolerances in sheet metal fabrication are influenced by various factors, underscoring the necessity of engaging with your fabricator at the initial stages of design. Ensuring CAD designs are aligned with Design for Manufacturing (DFM) standards is pivotal in establishing realistic and attainable tolerances, taking into account the complexities of material, equipment, and fabrication processes.
- Material Selection: The type and thickness of the material chosen have inherent tolerances. These natural variances play a crucial role in determining the overall tolerance of the finished part.
- Process Complexity: The number of processes a part undergoes directly impacts the ability to maintain tight tolerances. Tolerance stackup occurs as variances accumulate with each additional process, complicating precision.
- Equipment Precision: Different tools and machines used in fabrication have varied accuracy levels. The equipment’s precision capability is a determining factor in achieving specific tolerance levels.
- Fabrication Companies’ Capabilities: Each custom fabrication and assembly company has unique equipment and skills. The diversity in capabilities influences the company’s ability to meet particular tolerance requirements, making pre-engagement essential for aligning expectations and capabilities.
Material Impact on Sheet Metal Design
Material tolerance is an intrinsic aspect of sheet metal parts, characterized by the built-in variances that occur due to factors like material properties and fabrication processes. These tolerances are particularly influenced by the thickness of the material, with each thickness category exhibiting distinct tolerance levels.
Material Tolerance - Thickness
Selecting the appropriate sheet thickness is a pivotal step in sheet metal fabrication. This choice influences a variety of factors including the part's overall strength, weight, and integral design features such as minimum bend radii, hole and slot sizes, and flange length. Ensuring uniform thickness throughout the sheet metal parts is essential to guarantee consistent quality and performance.
Guidelines for Material Thickness
A common trend in material tolerance is a lean towards negative tolerance. This indicates that the actual dimensions of the finished part may slightly undershoot the specified measurements in the design. It’s a critical aspect to consider in the design and fabrication processes to ensure the functional and structural integrity of the final product.
For a detailed and specific understanding, referring to a thickness tolerance chart is advisable. Such a chart provides comprehensive insights into the expected variances associated with different materials and thicknesses, serving as a valuable resource for designers and fabricators aiming for precision and quality in the finished products.
Material Tolerance - Properties
Depending on the material and the process used for sheet metal production, sheet metal material can also exhibit differences in physical properties such as surface tension, spring back, tensile strength, etc.
One of the aspects when selecting a material is to consider the amount of variability and safety factor the design allows. As an example, hot rolled carbon steels generally show more material variability than cold rolled varieties (though they are also more costly due to the secondary processing). For more precision bending, cold rolled steel would be the better selection to limit difference between material batches and improve bending consistency.
Sheet Metal Process Selection & Tolerances
Precision and quality in sheet metal fabrication are heavily reliant on detailed and well-considered design, particularly when involving laser cutting and CNC bending technologies. The responsibility of the designer is to ensure that each element of the design is not only innovative but also compatible with the practical constraints of fabrication technologies. Every aspect, from the dimensions to the intricacies of curves and bends, must be tailored to align with the specific capabilities and limitations of the employed fabrication methods.
They are instrumental in ensuring that designs are tailored to the specific capabilities and constraints of the fabrication technologies, aligning innovative design aspirations with the practical aspects of material behavior, tool precision, and process efficiencies.
Sheet Metal Process - Laser Cutting
Laser cutting is a favored technique in precision sheet metal fabrication, known for its accuracy and efficiency. It’s especially suitable for projects demanding high precision, and is capable of achieving tolerances as tight as +/- 0.127mm. This method is versatile, handling materials up to 20 mm (0.78″) thick, accommodating a wide range of applications.
However, it's essential to consider the inherent limitations of laser cutting:
- Hole Size Limitation: The minimum hole sizes achievable are constrained by the size of the laser beam and the thickness of the material. In general, when the hole diameter is less than the material thickness the pierce point will often cause the hole to be out of tolerance.
- 3D Feature Constraints: Laser cutting is not suitable for creating tapered cuts or intricate 3D features due to the linear nature of the laser beam.
These constraints necessitate careful planning during the design phase to align project requirements with the capabilities of the process. It underscores the importance of a balanced approach, where design innovation is harmonized with practical execution to ensure the final components are both high-quality and fit for purpose.
Laser Cutting |
Linear |
Hole Diameter |
Standard |
High Precision |
Standard |
High Precision |
±0.20mm |
±0.15mm |
±0.25mm |
±0.10mm |
Laser Cutting Hole Size |
Minimum |
hole diameter ≥ ½ sheet thickness |
Best Practice |
hole diameter ≥ sheet thickness |
Maximum Hole Size |
Area = (π (diameter)²) / thickness |
Sheet Metal Process - Sheet Bending
CNC sheet bending involves the use of press brakes to manipulate sheet metal into desired shapes. While tooling is a fundamental aspect of this process, not all bending requires custom dies, offering a degree of flexibility in the fabrication process. Manual operators play a crucial role, and the type of equipment used can significantly influence the bend radius tolerances achieved. Key considerations in CNC sheet bending include:
- Corner Formation: Achieving a true 90° corner is typically not possible; corners will have a radius.
- Bend Angles: The standard tolerance for bend angles is ± 0.5°, ensuring precision while allowing for minimal variance.
- Bend Length: Tolerances for bend length are generally ±0.20 mm (0.010″) per bend, balancing accuracy and flexibility in the bending process
Sheet Bending |
Linear |
Bend Angle |
Standard |
High Precision |
Standard |
High Precision |
±0.1mm |
±0.05mm |
±1˚ |
±0.5˚ |
Sheet Metal Process - Stamping
Stamping tolerance refers to the allowable variance in dimensions and shapes during the stamping process. This process involves the use of dies to cut and form metal sheets into specific shapes and sizes. The precision of stamping is influenced by several factors, including the type of material, its thickness, and the complexity of the dies. Key considerations in stamping tolerance include:
- Material Behavior: Different materials respond variably to stamping, influencing the accuracy of the final product.
- Die Precision: The complexity and precision of the dies used directly impact the tolerance achievable.
- Process Speed: The speed of the stamping process can affect heat generation and material deformation, further impacting tolerance.
Stamping 1mm to 3mm |
Linear |
Hole Diameter |
Bend Angle |
Form Features |
Std |
Tight |
Std |
Tight |
Std |
Tight |
Std |
Tight |
±0.1mm |
±0.05mm |
±0.05mm |
±0.025mm |
±1˚ |
±0.5˚ |
±0.1mm |
±0.05mm |
Sheet Metal Process - Punching
Punching tolerance is concerned with the allowable deviations during the punching process, where holes or shapes are created in the sheet metal. The precision in punching is paramount to ensure the functional and structural integrity of the final product. Factors influencing punching tolerance:
- Tool Wear: The condition and wear of punching tools can affect the accuracy of the holes or shapes punched.
- Material Thickness: Thicker materials may present challenges in maintaining tight tolerances.
- Machine Calibration: The calibration and maintenance of punching machines play a crucial role in achieving desired tolerances.
Punching |
Linear |
Hole Diameter |
Angle Features |
Std |
Tight |
Std |
Tight |
Std |
Tight |
±0.1mm |
±0.05mm |
±0.1mm |
±0.05mm |
±1˚ |
>1˚ |
Sheet Metal Process - Rolling
Rolling tolerance pertains to the allowable variations during the rolling process, where sheet metal is passed through rollers to achieve specific thicknesses or shapes. The uniformity and consistency of the rolled sheet metal are critical and highly depends on the thickness of the material. Key aspects of rolling tolerance:
- Roller Condition: The state and alignment of rollers influence the uniformity of the rolled sheet metal.
- Material Properties: The inherent properties of the material, including its ductility and strength, impact the rolling tolerance.
- Temperature: The temperature during rolling can affect material behavior and, consequently, the tolerance achieved.
Sheet Metal Rolling |
Thickness |
Width |
±0.1mm |
±0.5mm |
Sheet Metal Design Features & Considerations
Sheet metal parts and designs generally incorporate a number of standard design features that improve part utility, strength, rigidity or other properties based on the final part application and needs. When incorporating these design features, it’s important to understand their role and what guidelines are needed for their use in a given part. We’ve laid out the basics of the most common features and the basic tolerances and tips for their use.
Bends and Relief Radius
In sheet metal fabrication, the design of bends and flanges is instrumental in mitigating the spring-back effect and reducing the risk of metal tearing. Utilizing standard die sets, including 0.80 mm (0.030″) tools for internal corners, can be advantageous, or alternatively, consulting with your fabricator about the available tools is essential.
Designing bends on the same plane and direction enhances efficiency by eliminating the need for part reorientation during fabrication. Moreover, consistency in bend radius is a cost-effective strategy, particularly crucial when working with thick materials where making accurate small bends can be challenging.
Offset Bends
Offsets, characterized by a double bend forming a Z-shape, are common in creating tiers in sheet metal or fabricating brackets and clamps. Like other bends, offsets should adhere to specific design guidelines to ensure structural integrity and functionality.
Key Design Guidelines for Offset Bends
- Inside Bend Radius: Should be at least equivalent to the material's thickness to prevent fractures or distortion. For low carbon steel, the minimum radius is either ½ the sheet thickness or 0.80 mm (0.03″), whichever is greater.
- Flange Length: Should be at least three times the sheet thickness to ensure stability and strength.
- Offset Bends: Maintain parallel planes at least two times the sheet thickness apart to avoid structural compromise.
Clearances for Bends
The following table outlines the minimum distance guidelines for various feature types in relation to bends in sheet metal fabrication. These guidelines are crucial for ensuring the structural integrity and functionality of the fabricated parts. Each row specifies the type of feature and the corresponding minimum distance that should be maintained to avoid structural issues or deformations during the bending process.
These distances are calculated based on multiples of the material thickness, bend radius, or specific feature dimensions, ensuring that each part is fabricated with precision and quality.
Feature Type |
Minimum Distance Guidelines* |
Between a curl and an internal bend |
±6 times the curl's radius plus the thickness of the material |
Between a curl and an external bend |
±9 times the curl's radius plus the thickness of the material |
Between a hem and an external bend |
±8 times the sheet thickness |
Between a hem and an internal bend |
±5 times the sheet thickness |
Between a counterbore and a bend |
±4 times the sheet thickness plus bend radius |
Between a countersink and a bend |
±3 times the sheet thickness |
Between hole and a bend |
±2.5 times the material length + bend radius |
Between a slot and a bend |
±4 times the sheet thickness plus the bend radius |
Between an extruded hole and a bend |
±3 times the sheet thickness plus the bend radius |
Between semi-pierced hole and a bend |
±3 times the sheet thickness plus the bend radius |
Between a notch and a bend in a perpendicular plane |
±3 times the sheet thickness plus the bend radius |
Between a notch and a bend in a parallel plane |
±8 times the sheet thickness plus the bend radius |
Between a dimple and a bend |
±2 times the sheet thickness plus inside radius of the dimple plus the bend radius |
Between rib to a bend perpendicular to the rib |
±2 times sheet thickness plus the radius of the rib plus the bend radius |
Curls
Curls in sheet metal fabrication are employed to impart strength to the edge of the sheet and mitigate the exposure of sharp edges, enhancing both safety and durability. Distinct from a hem, curls are characterized by the edge turning inwards, creating a circular roll. They can be designed to be off-center or on-center, depending on the specific application and design requirements.
Key Design Guidelines for Curls
- Outside Radius: It should be at least double the thickness of the material to ensure structural integrity.
- Curl Opening Radius: Utilizing a radius that is twice the material thickness results in a curl opening radius that is equal to the material thickness.
- Opening Size: The opening of the curl should be at least equivalent to the thickness of the material to maintain consistency and strength.
The following table delineates the minimum distance guidelines specific to the relationship between a curl and other features such as holes and bends in sheet metal fabrication.
Each entry in the table provides a precise distance metric, calculated based on the curl's radius and the material thickness, to guide designers and fabricators in achieving optimal spacing between these features, ensuring correct integration and enhanced structural performance.
Feature Type |
Minimum Distance Guidelines* |
Between a curl and a hole |
The curl's radius plus the thickness of the material |
Between a curl and an internal bend |
±6 times the curl's radius plus the thickness of the material |
Between a curl and an external bend |
±9 times the curl's radius plus the thickness of the material |
Hems
Hems are an essential element in sheet metal design, enhancing the strength of edges and eliminating sharpness, though they contribute additional weight to the part. Hemming is the process of folding a piece of sheet metal over itself; this can improve aesthetics by hiding edges or burrs, and provide added strength and reinforcement.
The pursuit of flat hems can lead to material fractures; hence, the design should focus on open or teardrop hems to mitigate this risk.
Key Design Guidelines for Hems
Open Hems:
- The inside diameter should be at least equal to the material thickness to ensure structural integrity.
- A cautionary approach is necessary for larger diameters as they may lose shape.
- The return flange should be at least four times the material thickness to maintain stability.
Teardrop Hems:
- These should also have an inside diameter at least equal to the material thickness.
- Openings should be at least ¼ of the material thickness to uphold structural integrity.
- The return flange should be at least four times the material thickness to ensure robustness.
Incorporating these specific design parameters ensures that hems contribute effectively to the structural strength and safety of the sheet metal parts, balancing the enhancement of functional attributes while adhering to safety standards.
The following table outlines the minimum distance guidelines between a hem and other features such as holes and bends in sheet metal parts. These distances, calculated based on material thickness and the hem's radius, are essential for ensuring structural integrity and optimal functionality during fabrication.
Feature Type |
Minimum Distance Guidelines* |
Between hem and hole |
±2 x material thickness + radius of the hem |
Between hem and internal bend |
±5 x material thickness |
Between hem and external bend |
±8 x material thickness |
Holes and Slots
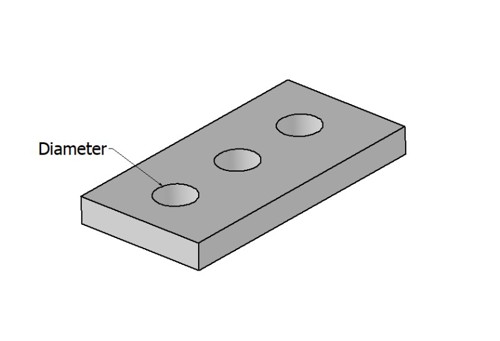
In sheet metal manufacturing, the design of holes is a critical aspect that requires precision and adherence to specific guidelines. The diameter of holes should be at least equivalent to the material's thickness to prevent excessive burring and ensure the longevity of the part. Proper spacing between holes is also essential to maintain their shape during subsequent processing steps.
Key Design Guidelines for Hole Design
- Diameter Requirements: Holes and slots should have a diameter at least equal to the material thickness or 1.00 mm (0.04″), whichever is greater. In the case of alloy or stainless steel, the diameter should be at least twice the material thickness.
- Consideration for Material Strength: For materials with higher strengths, the requirement for the diameter of holes and slots increases to ensure structural integrity and functionality.
These guidelines are integral to ensuring that the designed holes contribute to the overall quality, durability, and performance of the sheet metal components.
This table provides specific guidelines on the minimum distances required between holes, slots, and other features in sheet metal fabrication. Each parameter is carefully calculated, considering factors like material thickness and bend radius, to facilitate optimal design and fabrication outcomes.
Feature Type |
Minimum Distance Guidelines* |
Between hole and a bend |
±2.5 times the material length + bend radius |
Between a slot and a bend |
±4 times the material thickness plus the bend radius |
Between a hole or slot and edge |
±2 times the material thickness |
Minimum distance Between holes |
±2-3times the material thickness |
Between an extruded hole and an edge |
±3 times the material thickness |
Between an extruded hole and a bend |
±3 times the material thickness plus the bend radius |
Between semi-pierced hole and a bend |
±3 times the material thickness plus the bend radius |
Between semi-pierced holes |
±8 times the material thickness |
Notches and Tabs
Notches and tabs are two approaches to get additional space in a sheet metal design to avoid interference between features and to allow for tool access during fabrication. Notches involve the removal of an unwanted section of sheet metal from the outer edge of the part, while tabs are protrusions extending from the edge, often used for bending or joining purposes.
Key Design Guidelines for Notches and Tabs
Notches:
- Must have a thickness of at least 1mm (0.04″) or equivalent to the material thickness, whichever is greater.
- The length of a straight or radius end notch should not exceed 5 times the material thickness.
- For V notches, the length should be restricted to no more than 2 times its width.
- The corner radius of a notch should be 0.5 times the material thickness.
Tabs:
- Minimum width should be 3.2mm (0.126″) or two times the material thickness, whichever is greater.
- The depth of a tab should not exceed 5 times its width to ensure structural integrity.
These specifications are crucial to ensure that notches and tabs are designed and fabricated with optimal strength, precision, and functionality, contributing positively to the overall quality of the sheet metal components.
The table below outlines the minimum distance guidelines for positioning notches and tabs relative to bends, holes, and each other in sheet metal designs. These guidelines are essential to ensure the structural integrity and functionality of the fabricated parts, taking into account the material thickness and specific feature placements.
Feature Type |
Minimum Distance Guidelines* |
Between notch and bend in a perpendicular plane |
±3 x material thickness + bend radius |
Between notch and bend in a parallel plane |
±8 x material thickness + bend radius |
Between notch and hole |
±1.2 x material thickness |
Between notches |
±3.200 mm (0.125") or 2x material thickness (whichever is greater) |
Between tabs |
±1mm (0.04") or the material thickness (whichever is greater) |
Corner Fillets
Corner fillets are employed in sheet metal design to transform sharp edges into rounded ones, mitigating safety hazards and ensuring that the part is easily removed from the tool. These rounded edges not only enhance safety but also facilitate ease during assembly, surface treatment, and packaging processes.
Key Design Guidelines for Corner Fillets
- Size: The size of corner fillets should be equivalent to half the material thickness. This ensures that edges are sufficiently rounded to eliminate safety concerns while maintaining the structural integrity of the design.
Implementing corner fillets with precision contributes to the overall safety, functionality, and efficiency of the sheet metal components during both the fabrication and utilization phases.
Relief Cuts
Relief cuts are instrumental in managing the deformation of sheet metal, especially in thicker parts with small bend radii. They mitigate issues such as overhangs, tearing near edges, and undesired deformations during bending by channeling the material effectively.
Key Design Guidelines for Relief Cuts
- Width: The width of a relief cut should be at least equal to the material thickness to ensure effective management of material deformation.
- Length: The length should exceed the bend radius to accommodate the material displacement during bending.
Sheet Metal Dimples
Dimples are another feature of sheet metal design, and are small holes through the sheet metal created by custom metal dies. These dimples improve strength and rigidity, reduce weight by removing material, and can improve aesthetic appeal with a regular hole pattern.
Key Design Guidelines for Dimples
- Diameter: The maximum diameter should be restricted to 6 times the material thickness to maintain structural integrity.
- Depth: The depth of a dimple should not exceed half of its inside diameter to avoid compromising the material's strength and durability.
These guidelines ensure that relief cuts and dimples are designed and implemented with precision, contributing to the overall quality, functionality, and aesthetic appeal of sheet metal components.
In the following table specific guidelines for the minimum distances required between dimples and other features like edges, bends, and holes in sheet metal fabrication are shown.
MINIMUM DISTANCE GUIDELINES* |
Feature Type |
Distance |
Between dimple and edge |
±4 x material thickness + inside radius of the dimple |
Between dimple and bend |
±2 x material thickness + inside radius of the dimple + bend radius |
Between dimple and hole |
±3 x material thickness |
Between dimples |
±4 x material thickness + inside radius of the dimple |
Gussets
Gussets offer a practical solution to enhance the strength of flanges without the need for welding. These specialized components are integrated into sheet metal designs to reinforce structural integrity, ensuring that the final products can withstand various stresses and strains during their operational life.
The production of gussets typically involves custom tooling, a process that allows for precision and customization to meet specific design and performance criteria. This approach ensures that gussets are tailored to fit and function optimally within the broader design, contributing to the durability and reliability of sheet metal components while also streamlining the fabrication process by eliminating the need for welding.
Outlined below are the minimum distances to be maintained between a gusset and other features like edges and holes in sheet metal components. These guidelines are calculated considering the material thickness and the specific features involved, aiming for a balanced and efficient design.
Feature Type |
Minimum Distance Guidelines* |
Between gusset and edge |
±8 x material thickness + radius of the gusset |
Between gusset and hole |
±8 x material thickness |
Lances
Lances are a specific feature in sheet metal fabrication characterized by the technique of cutting and bending a piece of material without removing any part of it. This process effectively alters the shape of the material and is commonly employed to create vents and louvers, facilitating airflow through the part.
- Open Lances: These should have a minimum width of 3.00mm (0.125″) or two times the material width, whichever is greater. The maximum allowable width is capped at five times the initial width to maintain structural integrity.
- Closed Lances: The minimum width for closed lances is set at 1.60mm (0.06″) or twice the material width, whichever is greater. In terms of height, it should not exceed five times the material thickness at a 45° angle to ensure stability and functionality.
The creation of lances often necessitates specialized tooling to achieve precise cuts and bends, ensuring that the modified shape meets the design specifications and functional requirements. Below is detailed the rewired distances between a lance and a through hole.
Feature Type |
Minimum Distance Guidelines* |
Between lance and hole |
±3 x material thickness |
Ribs and Embossments
Ribs and embossments are integral features that enhance the structural integrity and aesthetic appeal of the final products. Ribs add strength and rigidity to sheet metal components, reducing the need for thicker, heavier materials.
Embossments, on the other hand, are raised or recessed patterns on the surface that can serve both functional and decorative purposes. These features are produced to meet specific design and performance criteria, ensuring that each sheet metal component is optimized for its intended application.
Key Design Guidelines for Ribs and Embossments
- Rib Inside Radius: The inside radius of a rib should not exceed three times the material thickness to ensure structural stability.
- Round Embossment or Rib Depth: The maximum depth is equal to its inside radius, balancing structural integrity and design aesthetics.
- Flat Embossment Depth: The depth should be equal to the inside radius plus the outside, ensuring a harmonious integration into the overall design.
- V Embossment Depth: The maximum depth for a V embossment is capped at three times the material thickness, ensuring it is structurally sound and aesthetically pleasing.
The table below outlines the minimum distance necessary for the integration of ribs or embossments in sheet metal components.
Feature Type |
Minimum Distance Guidelines* |
Between rib or embossment to a hole |
±3 x material thickness + radius of the rib |
Between rib to an edge in a perpendicular plane |
±4 x material thickness + radius of the rib |
Between rib to an edge in a parallel plane |
±8 x material thickness + radius of the rib |
Between rib to a bend perpendicular to the rib |
±2 x material thickness + radius of the rib + bend radius |
Between parallel ribs |
±10 x material thickness + radii of the ribs |
*Please use these numbers as sheet metal design guidelines only and always check with your fabricator for their recommendations before completing your design.
Considerations for Sheet Metal Post-processing
Welding
Welding preparation is a critical step, especially for certain materials that require pre-welding processes like grinding. The design phase should anticipate these needs to ensure a seamless and efficient welding process. Precision in establishing tolerances is essential, as tighter tolerances can reduce the need for additional welding materials and techniques.
Key Design Guidelines for Welding
- Hand Welding: This technique is recommended for materials with a thickness greater than 20 gauge, ensuring an optimal balance of safety and effectiveness.
- Welding Head Access: The design must accommodate the physical space requirements for welding heads. In confined spaces or internal corners, a minimum clearance of 40 to 50mm is often necessary to ensure the welding equipment can access and effectively weld the designated areas.
These design considerations are crucial to facilitate a streamlined welding process, enhancing both the quality and efficiency of the final fabricated product. In the table below are additional guidelines for consideration.
Feature Type |
Minimum Distance Guidelines* |
Between a weld and the edge |
±2 times the diameter of the spot weld |
Between welds |
±10 times the material thickness |
Countersinks and Counterbores
Countersinks and counterbores play a critical role in achieving a flush surface for seamless fastening between parts. A countersink is characterized by a conical hole, engineered to house screws, ensuring a smooth surface post-assembly.
In contrast, a counterbore is characterized by a straight, flat-bottomed hole, typically designed to accommodate bolts or nuts. It's important to note that these features are not advisable for use in thin materials due to structural integrity concerns.
Key Design Guidelines for Countersinks and Counterbores
- Countersink Depth: The depth of a countersink should not exceed 0.6 times the thickness of the material to maintain structural integrity.
- Countersink-Fastener Contact: There should be at least 50% contact between a countersink and a fastener to ensure a secure and stable connection.
These guidelines are essential to optimize the functionality and durability of the assembled metal parts, ensuring that the countersinks and counterbores are effectively integrated without compromising the structural integrity of the materials involved.
The following table outlines the minimum distance parameters that should be maintained between these features and other elements like edges and bends, as well as between the features themselves.
Feature Type |
Minimum Distance Guidelines* |
Between countersink and edge |
±4 x material thickness |
Between countersink and bend |
±3 x material thickness |
Between countersinks |
±8 x material thickness |
Between counterbore and edge |
±4 x material thickness |
Between a counterbore and a bend |
±4 x material thickness + bend radius |
Minimum distance Between counterbores |
±8 x material thickness |
Designing for Fasteners & Rivets
One of the more common ways of joining sheet metal parts is to include fasteners or rivets to join sheet metal parts and sub-assemblies. While fastener selection is its own complex topic, there are some design considerations to make when fasteners need to be included into the part design.
Key Design Guidelines for Inclusion of Fasteners
- Threaded Fasteners: the thread width and depth need to be considered and calculated based on the thread and screw type being used (machine screws being most common). The material will also need to be thick enough to accommodate sufficient turns (at least 3) when threaded.
- Rivets: Rivets will have a minimum / maximum hole size to be considered when they are installed. Your rivet supplier will have suggested guidelines on hole size depending on rivet selected.
- Hardware Placement to Edge: there needs to be a minimum distance from a threaded hole to the edge of a part to make sure the hardware is secure, no damage will occur during threading and that the part will be well secured.
Feature Type |
Minimum Distance Guidelines* |
Hole to hardware |
±0.254 mm (0.010″) |
Edge to hardware |
±0.254 mm (0.010″) |
Hardware to hardware |
±0.0381 mm (0.015″) |
Bend to hardware |
±0.0381 mm (0.015″) |
You should use these numbers as a guideline, but remember to check with your sheet metal fabricator when you pass over the drawing. The PennEngineering website provides additional details and specifications for common fasteners.
Komaspec’s Turnkey Sheet Metal Manufacturing
With over 15 years of expertise in sheet metal fabrication in China, our skilled team of engineers and technicians at Komaspec is committed to excellence in every project.
With more than twenty engineers and project managers, we provide in-depth reviews and analysis of sheet metal part design, offering comprehensive Design for Manufacturability (DFM) feedback.
Our collaborative approach aims to enhance product functionality while minimizing manufacturing and tooling expenses, ensuring that your project is both cost-effective and of the highest quality.
Request a Quote